| David L O Smith - Home |
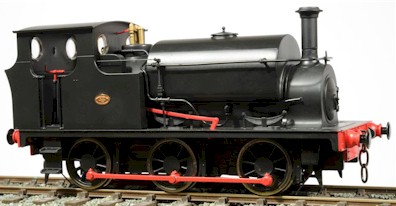
Great Central Railway No. 278
|
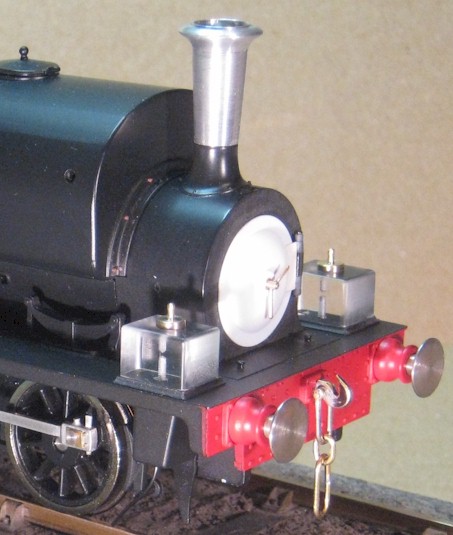
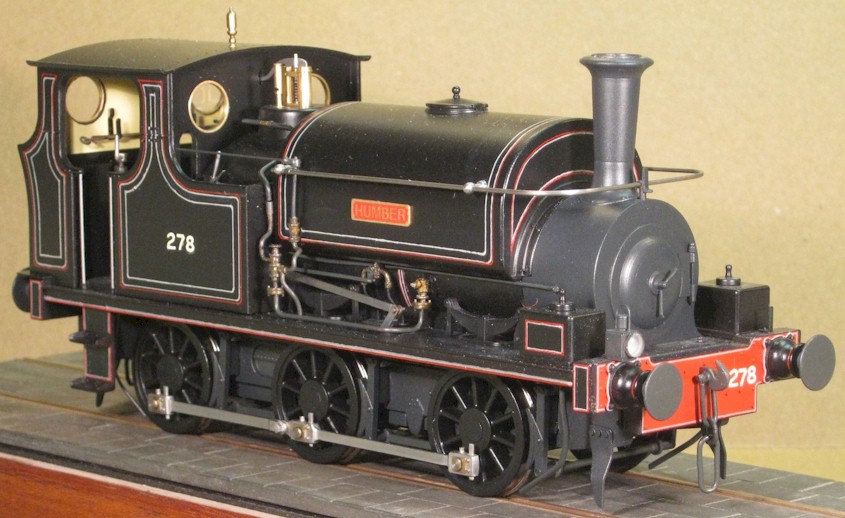
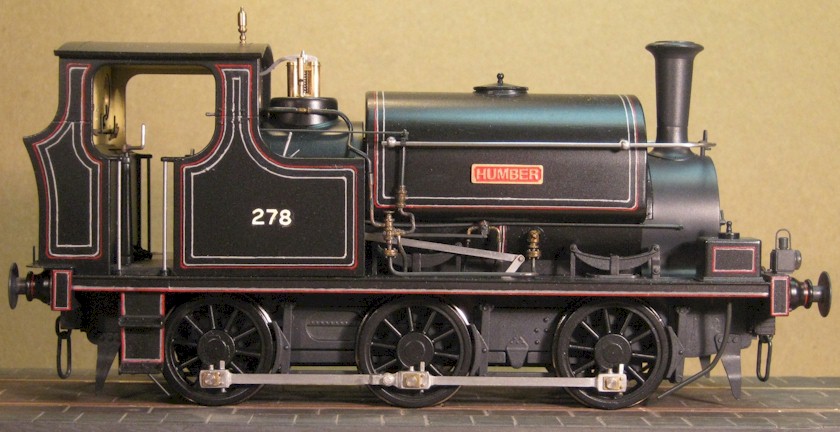
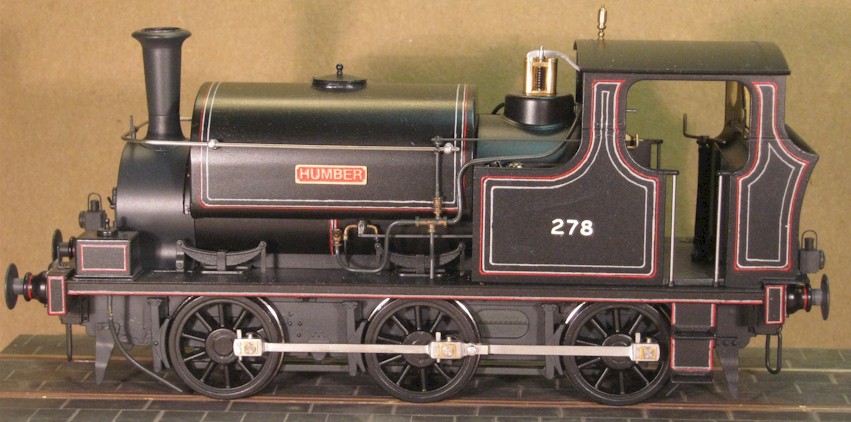
A 7mm scale (O Gauge) model of Hudswell Clarke 0-6-0ST Great Central Railway class 4 No. 278 ‘Humber’ of 1909 which was originally a contractor's loco but entered GCR ownership in 1911. It was numbered 5278 by the LNER and became class J61. There are more photographs of the finished model near the end of this page but I describe here how I reworked a model by Ixion Model Railways of a Hudswell Clarke contractors' 0-6-0ST (below) into a representation of this particular prototype, which is similar but was older and slightly smaller.
|
|
In my opinion, this ready-to-run model is a genuinely fine piece of engineering and I would consider only a few of my modifications to be improvements, most were simply alterations to the standard model to make an Ixion Hudswell Clarke with a bit of a difference. |
||||||
| Coupling rods | Wheels | Buffers | Safety valves | Smokebox door | Sandboxes | ||
| Tank | Buffer planks | Bunker | Brakegear | Cab | Painting | ||
|
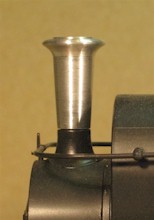
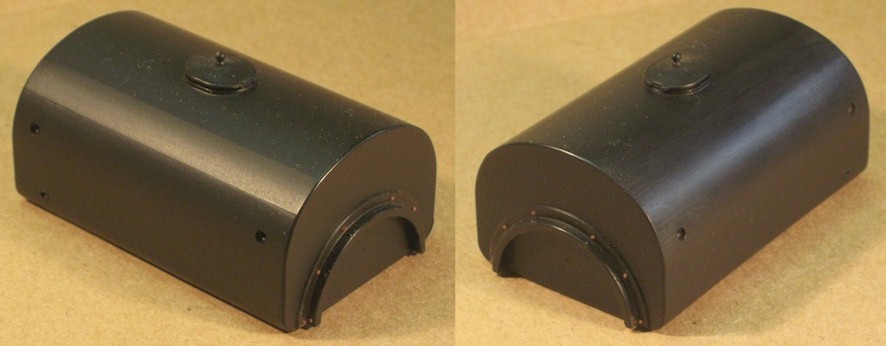
I made a start, in an odd moment, by turning up a Robinson GCR chimney (right). I retained the original saddle and, when I have finished all the other reworking, I will blend the turning into it with some filler. |
|
|
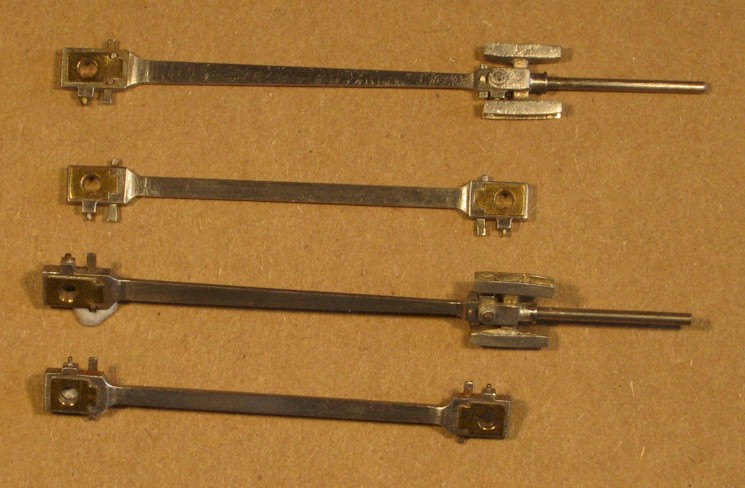
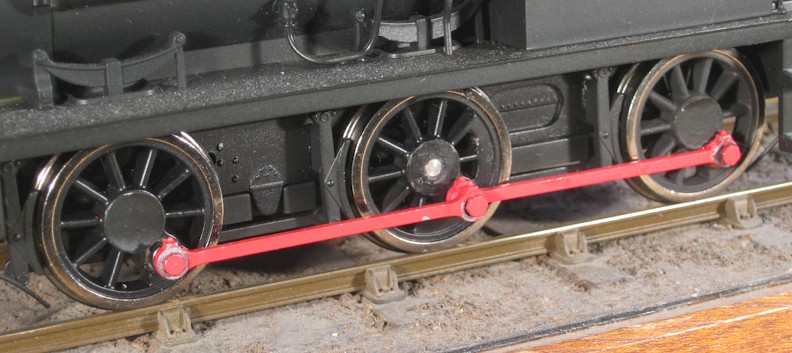
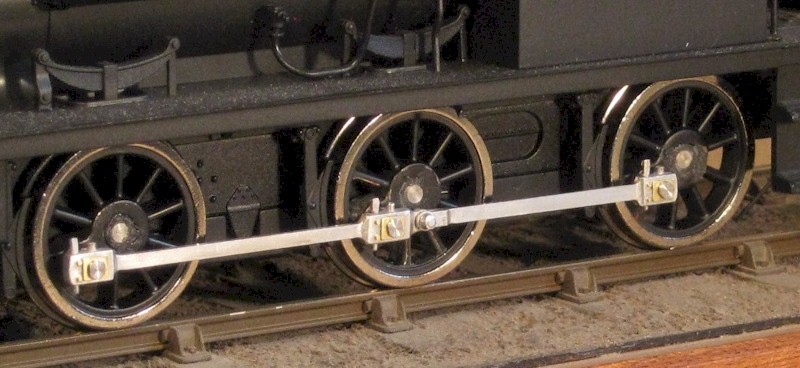
The Ixion model has unusual (but correct for their chosen prototype) coupling rods that are ‘jointed’ on the central crankpin rather than with a knuckle joint on one of the rods. As well as the more conventional knuckle joint, Humber had ‘marine bigends’ with half-brasses that were adjusted with a cotter pin; this form was common on the older locos, such as Easingwold No 2. I have made conrods and coupling rods from scratch before and I have milled them out of solid steel. To the left is a set for Wantage Tramway No. 5 Jane which I started as the Model Railway Journal 7mm project in 1999 with the intention of keeping up – no chance, even if I hadn’t been working full-time I could not have kept up so I set it aside to finish ‘when I have more time’ and, until the Ixion Hudswell Clarke came along, it was actually my next small loco project. (Anybody else stall on this project? I can recall only ever seeing two built locos but the two MRJ brass casting packs come up for sale occasionally, so I know others must have intended to build a No. 5 at one time.) |
|
As Vic Burles points out in his article ‘Digital Modelling’ (MRJ No. 221), holding the job whilst milling out such complex shapes is quite a challenge and so I decided that, this time, I would mill the parts from nickel silver, tin them all over and assemble them just as I would etchings in a kit. Verdict: mistake; I shall not do it this way again, I’ll cope with the awkward holding down and mill from the solid as before. But I had to try it. Nothing ventured, nothing gained. It was quite a lot of work and although I was pleased with the result (right) it was not less work, and it was rather more demanding on the nerves, than milling from the solid. |
|
|
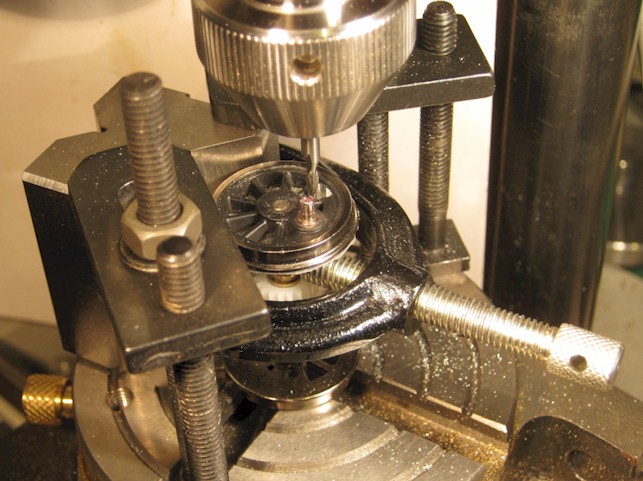
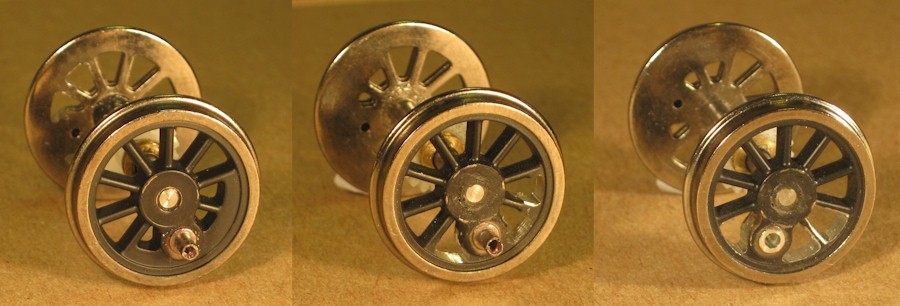
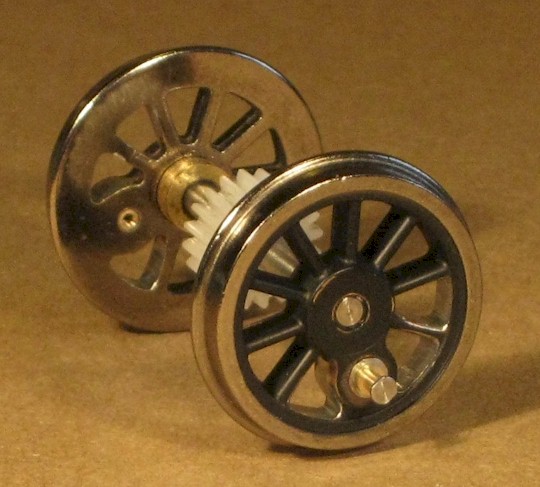
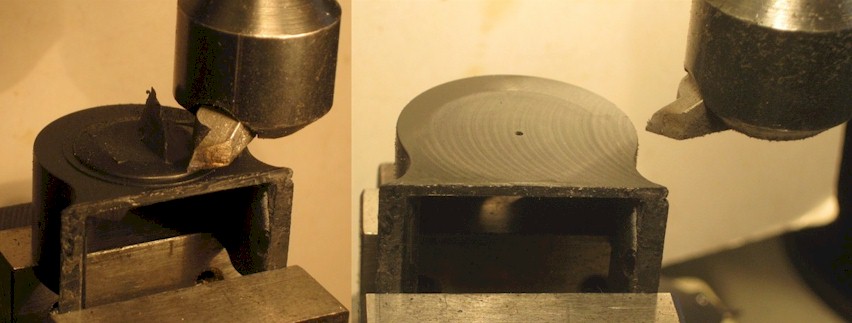
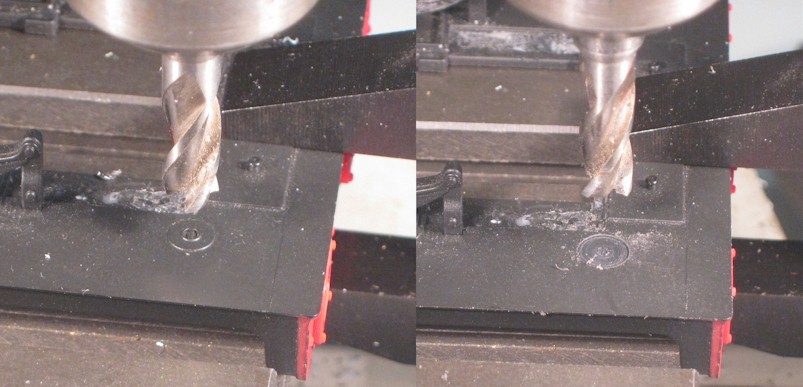
Of course, because the Ixion model has short rear crankpins (accommodates one rod end), long centre crankpins (accommodate two rod ends) and a long, but packed out leading crankpins (accommodates one rod end away from the boss), I could not just replace the original rods with my new ones. I needed to drill out the old pins (I think they are moulded integral with the wheel) but, again, holding the job (the complete wheel set) firmly and accurately was going to be a challenge. It was worth taking a bit of effort over this though because, unlike the Ixion prototype and Easingwold No 2, Humber did not have balance weights on the centre (driving) wheels so I was going to have to mill them out. As you may see (left) I clamped a V-block to the rotary table and then clamped the wheel set in the V so that it was firmly and accurately held. Using a 2mm diameter slot drill, and by twiddling the various handles (X and Y on the milling table and angular on the rotary table) and with a clear head, I machined out the unwanted material. Once through the plating, the aluminium casting machined beautifully with a very satisfying result. |
|
The photograph (right) illustrates i) before, ii) after milling out the weight, and iii) after cleaning up with a file and with the old pin milled off and drilled out. |
|
|
|
By now, I was back on old ground and I needed only to make a set of crankpins but, to reproduce the plain head of the prototype I needed to make the pins hollow and tapped 12BA for 12BA cheese head screws that have the screwdriver slots faced off and opposing flats milled on to suit a 2mm AF spanner; although this leaves them ‘not quite’ round, it’s not something I think you’d likely spot without being told. |
|
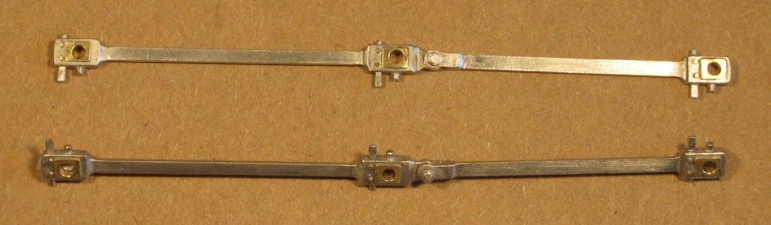
So, to recap: this is what we had before: |
|
|
and this is what we have now: |
|
|
|
As a post script to this phase: having completed the tasks, I dipped the former rods and screws in paint-stripper to remove the somewhat daubed on red paint and spurious shiny glue (and, in the process, destroying some unique oriental finger print art). I was quite impressed to find that I had a very decent, detailed set of rods and six nifty 1.5mm hex-head machine screws. |
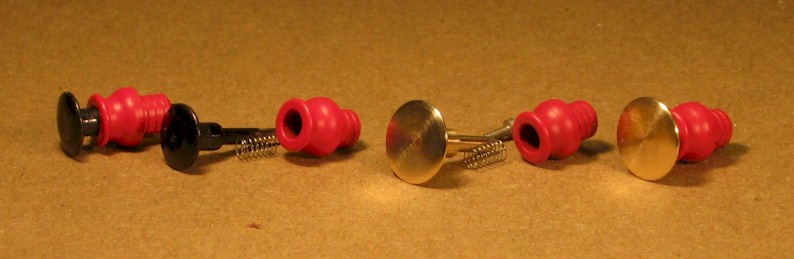
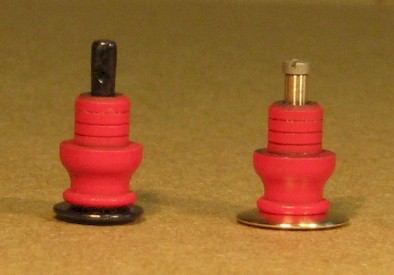
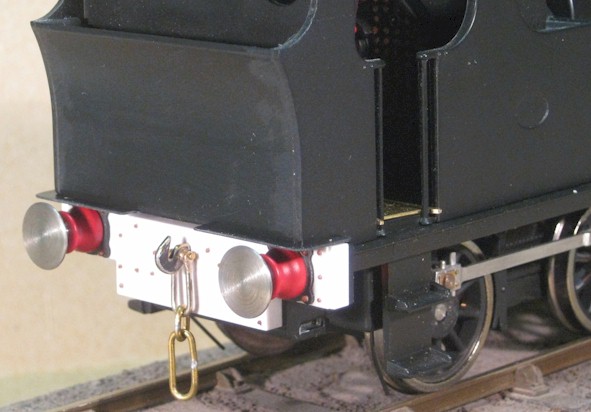
Transformation from 13" to 16" diameter buffer head
|
I decided to make replacement buffers with larger heads. The Ixion buffers stocks are made of brass and are glued into the buffer planks but, with a bit of bothering, wiggling and turning, they are soon removed to allow you to work on the complete buffer assembly. The buffer shanks are retained in the buffer stocks by a simple crimp in the end of the shank; this is easily removed by filing to separate the shank, spring and stock. The Ixion buffer heads are 7.6mm in diameter (13”) and I made replacements of 9.3mm (16”), which is the best estimate that I could make from scaling off two photographs. They are a simple brass turning and are retained by a 12BA cheese head screw in the end of the shank. |
|
Buffers before and after
|
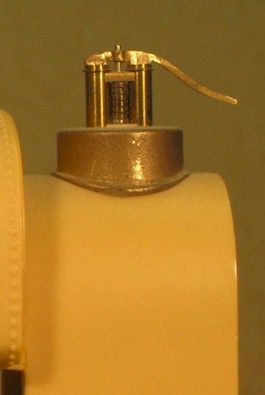
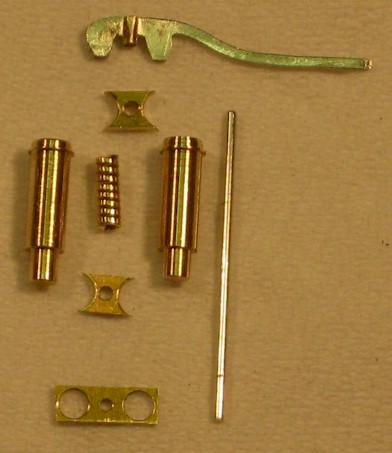
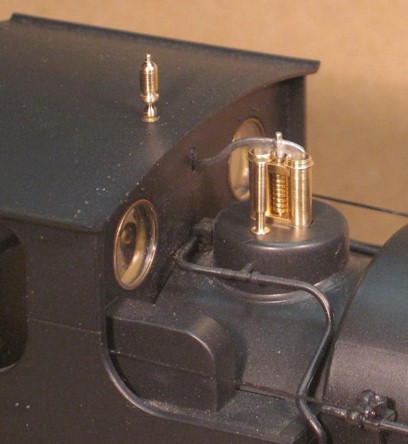
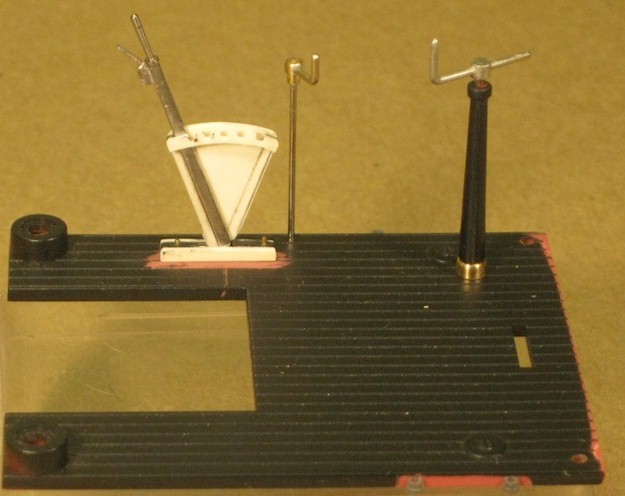
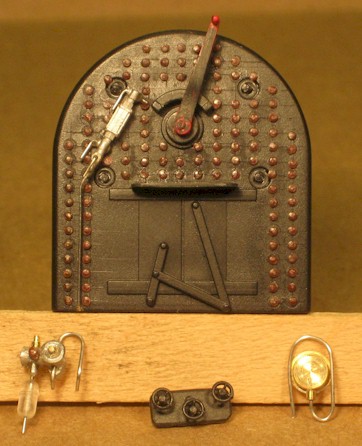
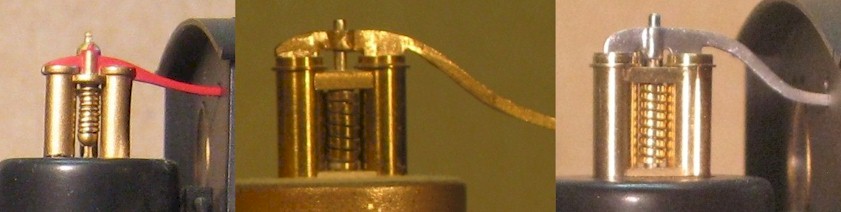
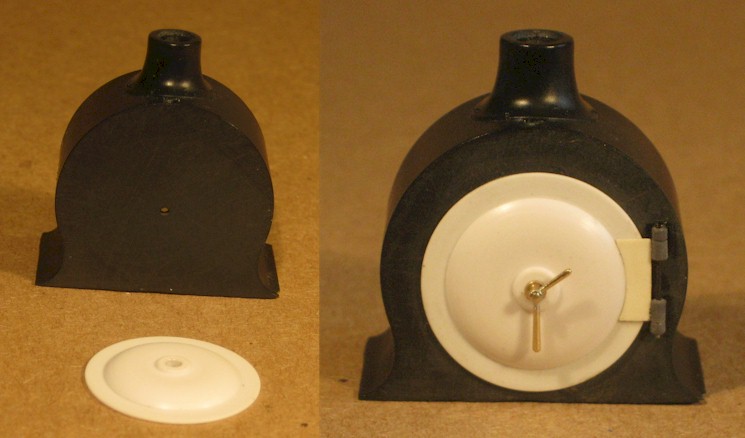
For my Easingwold No.2 Hudswell Clarke, based on an Impetus kit, I made a new safety valve assembly (right) and I decide to make another one for my Ixion model. |
|
|
The parts are all relatively simple exercises in turning and drilling and are seen here (left) laid out ready for a trial assembly. |
|
Although the original Ixion safety valve assembly is made of ‘brass-painted’ plastic, the whistle is actually made of brass but it is also ‘brass-painted’ to match the painted plastic. However, it cleans up very nicely and I decided to reuse it projecting from the cab roof in GCR fashion and also to make a plain, long, thin whistle to fit in its place on the safety valve turret, as was common on GCR dock locos. Here (right) is a dry trial assembly of the SV parts before soldering, the cleaned up Ixion whistle and its replacement. |
|
|
|
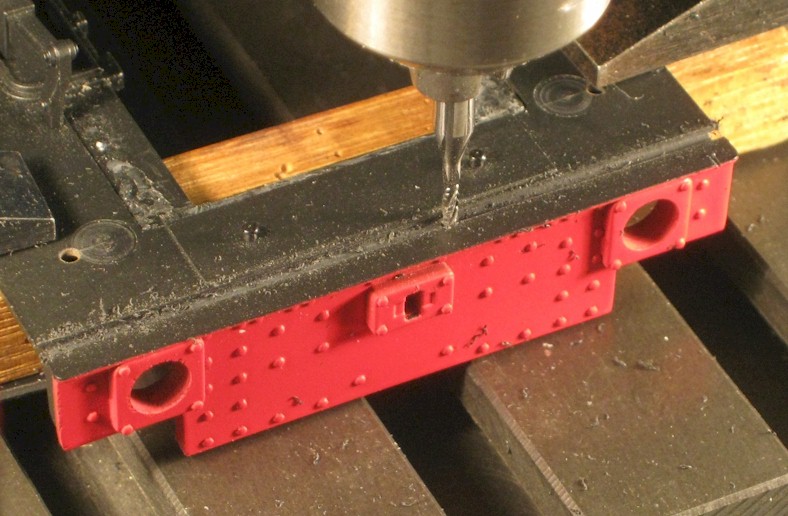
To be like the prototype, the safety valve assembly should be projecting through a long hole in the shroud of the turret so the shroud (which is what we actually see on the model) needed to be recessed to represent the hole; this was a simple milling exercise. |
|
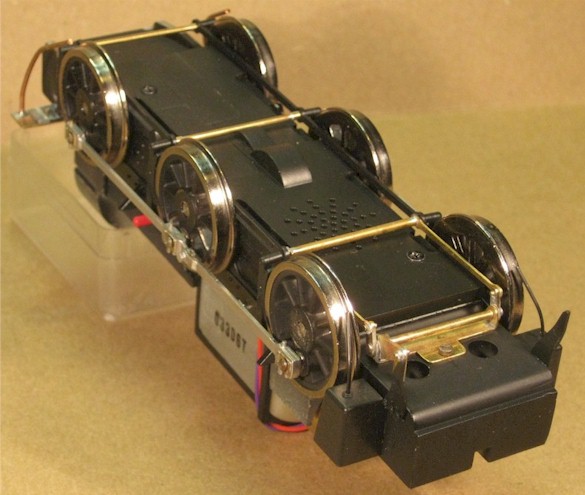
I did, for a second, think about clamping the whole loco to the milling table but I soon thought better of it and that perhaps it was time to find out how this pack of tricks came apart. It’s rather clever but quite easy. |
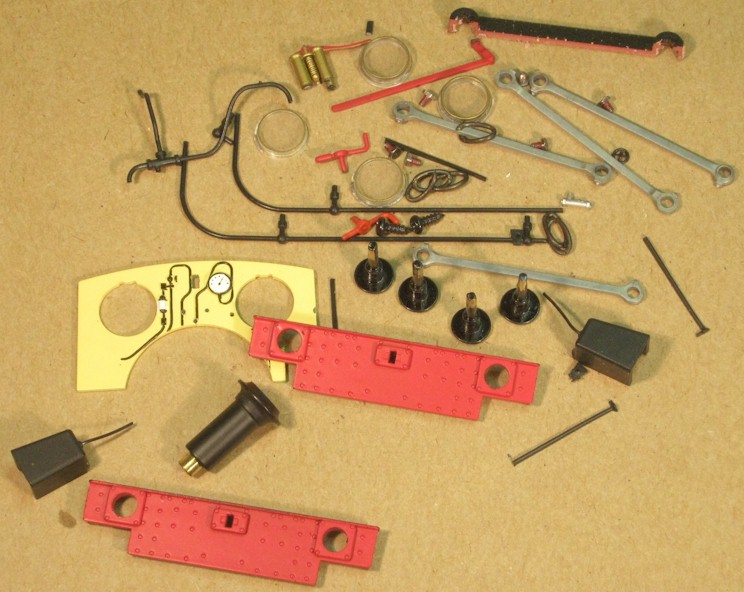
![7mm scale [0 gauge] Ixion Hudswell Clarke 0-6-0ST in parts](images/RailwayModels/GCR278InParts.jpg)
Ixion Hudswell Clarke 0-6-0ST in parts
|
|
My wife’s comment when I was taking the photograph above was ‘Good value these ready-to-run kits, are they?’ She does have a point but I just cannot seem to leave things alone. So, here (left) we have the finished items in place (not perfectly upright but they will be when they are finally glued in place) |
The original Ixion safety valve assembly (left) and my creation for
Easingwold No. 2 (centre) that enticed me to make another for GCR No. 278
(right)
|
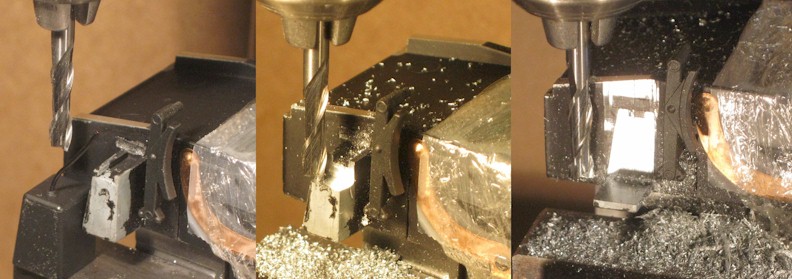
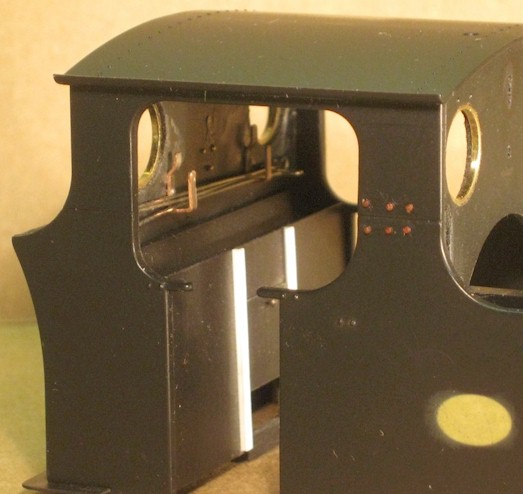
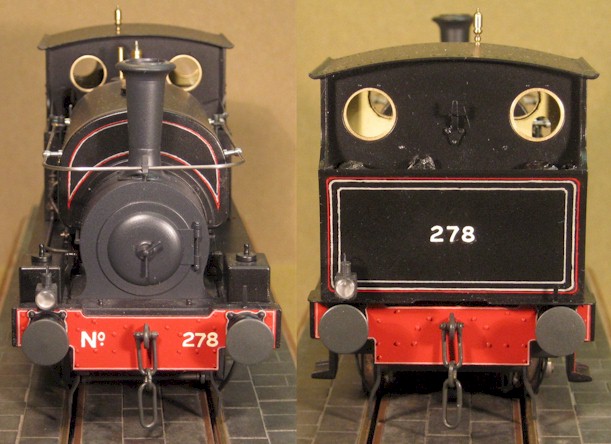
The Ixion model has a very nice representation of the later Hudswell Clarke smokebox door (right), with typical steam loco hinges, but Humber was older and had a one-piece hinge on the door. For a short moment, I did consider trying to file the detail off the existing door and smokebox front but I very soon thought better of it as I knew that I would fail. There was nothing for it but it was going to have to be machined off; to do that the smokebox was going to have to come off the running plate so I sat listening to a radio play and gently ‘bothered’ it for about a quarter of an hour and the glue gradually gave way. |
|
|
I then put the assembly in the machine vice in the milling machine and used a fly-cutter to remove the door and hinges in thin layers (a sort of 3D unprinting), as you may see on the left hand side in the photo (far left). So accurate was the plastic moulding that the finishing cut across the front of the box was almost perfect (left) and a few figures-of-eight on my emery board was all that was needed to clean up for a flat and smooth surface. |
|
It was a relatively easy, and rather satisfying, job to turn up a new smokebox door from polystyrene card (right). A little more time on the lathe and drilling machine produced new smokebox darts in brass and then some plastic hinge parts; an entomology pin completed the job. (far right). |
 |
|
|
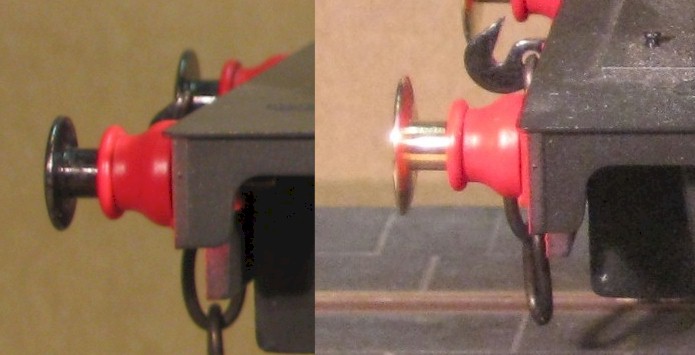
Whilst I had the loco apart, I tidied up the draw hooks and replaced the three links of rather disappointing ‘bath plug chain’ with the characteristic D-shackle (two doughnuts silver soldered onto a 0.8mm nickel silver wire and bent around into a D), short and long links from brass wire. |
|
On the Ixion model, the front sandboxes are below the running plate but earlier locos, such as No. 278 and Easingwold No.2, had theirs above so I made new ones from clear acrylic (marketed variously as Perspex, Plexiglas and Lucite), which is a much underused material, in my opinion: it is usually free (quite large off-cuts appear in skips and waste bins), is very easy to machine, drill, file, etc. and it takes glue and paint well – OK, I agree, you cannot solder to it! The main bodies are a simple exercise in milling but I was quite tickled by the bases (in black plastic card) that have ‘moulded’ concave edges, produced with a ball-nosed milling cutter. I turned up the rather ornate sandbox filler lids from brass. |
|
|
Before the sandboxes could be screwed to the running plate with 12BA screws from below, the projections of the original sandbox filler lids needed to be removed. Now I could probably have done this with a small chisel, given that the surface doesn’t need to be flush as it will be underneath the new sandboxes, but it suited me better to remove them with an endmill. The old sandboxes below the running plate that are attached to the frames will also have to be removed later. |
|
Other modellers have commented on the two apparent ‘creases’, rather than uniform curves, on each side of the tank of this model (right). I removed these easily with files, emery sticks and then a final polish with Duraglit (brass polishing wadding), or equivalent, just to check that the surface is a continuous curve (far right). Whilst on the tank, I added some additional simulated bolt heads on the tank to smokebox flange. |
|
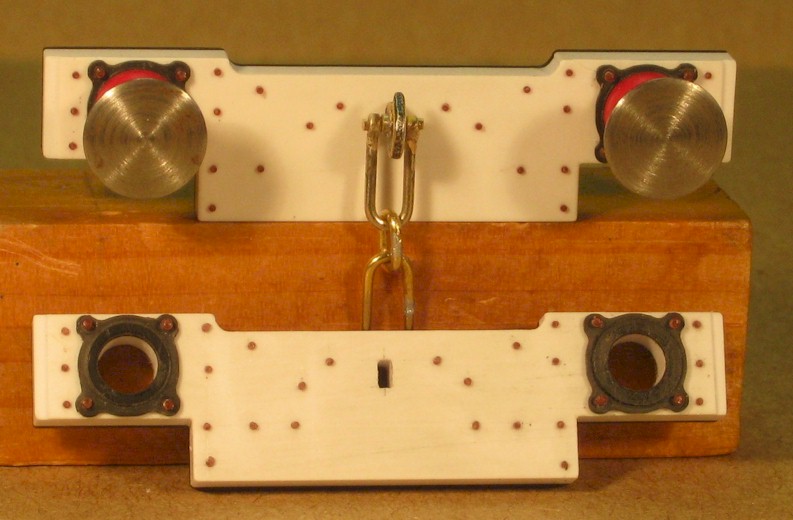
I milled the buffer planks from a sandwich of 3mm and 1mm plastic card (to make up the required 4mm thickness) and simulated the bolts by inserting plastic rod. The finished item is shown at the bottom of the photo (right) and with buffers and drawhook in place at the top. |
|
|
|
I mounted the running plate in the milling machine and used a 1mm slot drill to cut off the original buffer planks to leave a square and smooth surface, all in one operation. |
|
An application of the solvent united the new buffer planks with the running plate and this was the result for front (right upper) and rear (lower). |
|
|
The original sandboxes are neat plastic mouldings, glued over lugs in the diecast chassis, so I prized off the mouldings and milled away most of the lugs, effectively leaving thin brackets to hold the new sandpipes. In the three-part photo (left), a plastic moulding is posed below the slot drill, which will remove most of the lug in stages (centre) to leave a little bracket (right). To protect the ‘works’ from the detritus of this operation, I wrapped it in that most handy of modellers commodities: cling film. I understand that it may also be used in the preparation and conservation of food but I have a roll in my workshop to protect things from swarf and (paint) dust. I have been asked about my warranty … |
|
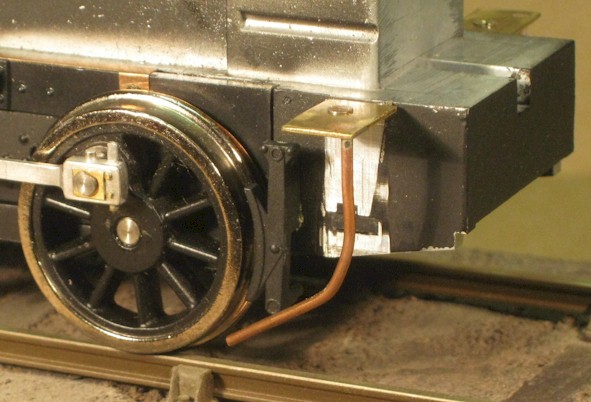
Looking at the photographs and the drawing of GCR 278, there is no visible means of support for the leading sandpipes but they do appear to be of quite large diameter, so perhaps they were designed to be self-supporting. I represented these pipes in shaped copper wire soldered to small brass plates, which I screwed (12BA) to the little brackets milled from the core lugs of the original sandboxes (right). |
|
|
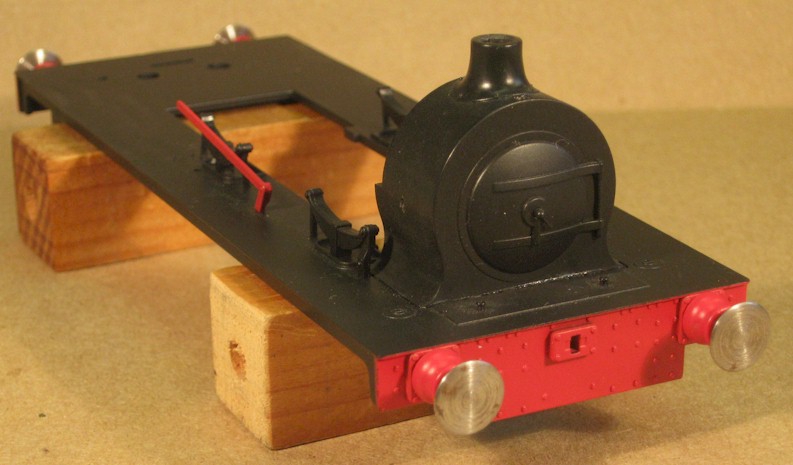
I cut out part of the lower bunker to accommodate the raised and deeper rear buffer plank and I added the characteristic thin plate that juts out over the buffers (left). Looking like a brass floor in the cab is actually a temporary spacer (sort of H-shaped with a very thick horizontal bar) to keep the cab opening parallel and the correct width – by original design, this is achieved by the fitted floor but, in cutting out the lower part of the bunker and the rear of the floor (which is in the bunker), the location for the two rear screws was lost and they will need to be relocated. On my model, the fit of the rear part of the bunker to the sides was rather poor; although it is exquisitely moulded, it is slightly undersize (leaving quite sizable gaps either side) so I filled these in with the epoxy glue that I used to reunite the back with the sides and then filed and sanded all smooth. |
|
I never cease to be surprised and impressed by the speed with which many modellers assemble and finish off their locos; me, it takes a long time, particularly the finishing off but I do find this part rather pleasing. At this finishing off stage, I start making and fitting the small parts – and ticking them off the list, one by one until I reach the end. |
|
|
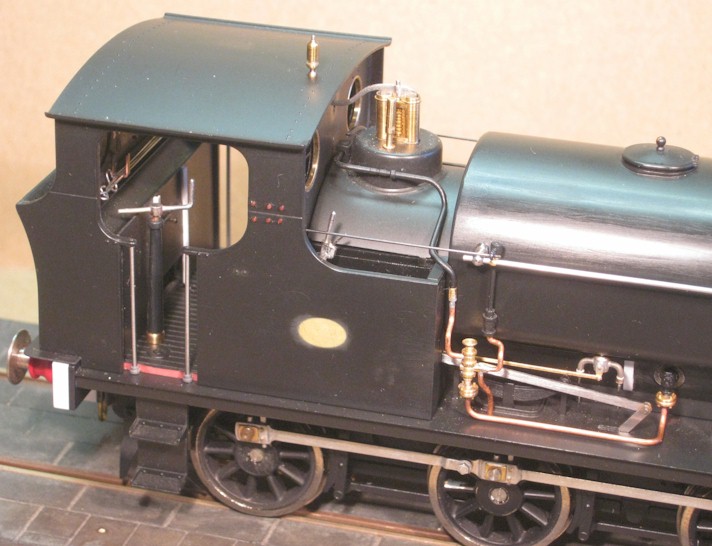
Underneath the loco at the rear, I made a representation of the brake cross-shaft, cranks and the rod to the brake standard (partly obscured by a guard-iron in the photo right). The new links that reach forward to the rear brake hangers are retained by a crossbar between the hangers, which also positively retains the plastic brake linkage to the centre and forward brake hangers (other Hudswell Clarke owners have reported that these links can spring loose). I added similar brass crossbars to the centre and forward hangers. The thick keeper plate that retains the wheel bearings makes the frames appear rather deeper than they should be so I milled away its edges between the wheels, leaving it full depth behind the wheels where the frames would be deeper anyway. Whilst I was at it, I milled away the two redundant gear wheel covers associated with the forward axle; as this resulted in two small rectangular holes I milled all round them about 0.5mm deep and glued in a piece of plastic card. I also milled away a slot in the smaller of the gear wheel covers in front of the centre axle to make clearance for the centre brake crossbar. |
|
| Inside the cab, I added a reversing leaver and sand operating control to the floor, and a made a finer handle for the brake standard, which also needed lengthening so that the handle would clear the modified lower cab back sheet |
|
On the prototype, the lower back sheet projects above the downward sweep of the upper sheet to provide a useful ‘shelf’ to store things on/in so I made a suitable overlay that also included a slightly raised bunker door. To the upper back sheet, I added two fire iron brackets and some fire irons made from brass wire (the set provided with the kit were nicely moulded but they looked far too thick to me). |
|
|
|
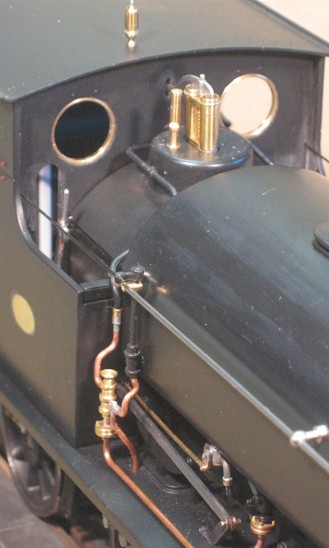
I choose to alter the backhead by replacing the sight glass with a more detailed casting and pipework, adding prominent ends to the firebox stays and placing a small shelf above the firebox doors. The separate insert for the front upper cab sheet is a very clever bit of design, and I had originally intended to modify and reuse it, but I made separate fittings and pipework (shown in front of the wooden prop in the photograph left). I would like to say again that I would not like my modifications to be seen as a criticism of the original RTR model, because it is a truly fine piece of work, but rather as just my way of being creative and finishing up with a model that is substantially different to those belonging to others. |
|
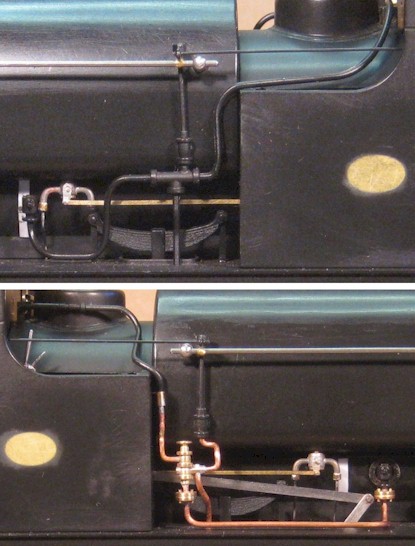
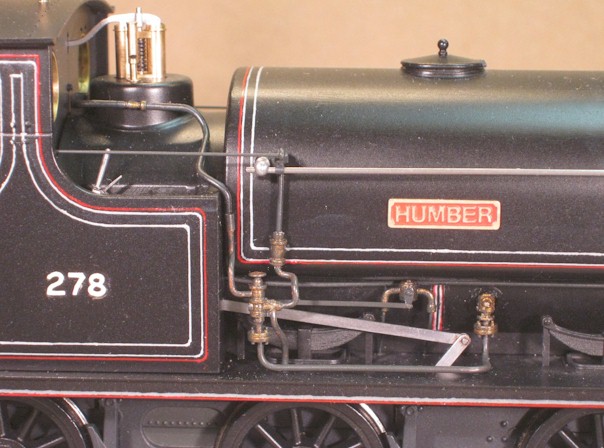
The arrangements for the injector on the LHS of No 278 (photo right, upper) was just as portrayed by the Ixion model but that on the RHS (lower) was appreciably different. However, I was able to use most of the live steam pipe from the manifold behind the safety valves, the water valve on the tank and its control, and the clack valve on the boiler, although I added a larger flange. I made up a new injector body and pipe flanges in brass, and replacement pipework from copper wire. No. 278 was originally a contractor’s locomotive and, unlike most similar Hudswell Clark locomotives, it was fitted with flange washers that it retained in GCR ownership; the valves are located either side on the lower edge of the saddle tank. I made the valve bodies and operating linkages from brass (the control rod from 0.5mm brass wire flattened to 0.65 x 0.35 with rolls) and the pipes from copper wire. Other details include boiler bands (white plastic strip), a polished steel reach rod and the filled-in recesses intended to locate the makers' plates but which are absent on No. 278. |
|
|
|
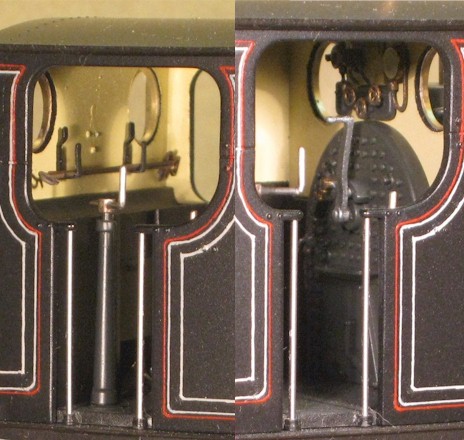
Unlike the Ixion model, many locos did not have a cover over the reversing lever in the RHS cab extension so the handle was in ‘fresh air’ when in forward gear. To remove the cover and the top to the cab extension required some delicate milling and much calmness in the workshop. From the photographs that I have seen of preserved locos, there was no top to the LHS cab extension either, which appears to have been used as an auxiliary coal bunker, so I milled that away as well. I did consider retaining the clear plastic windows with their painted simulated brass surrounds. They are a neat idea but the windows were slightly opaque and not optically ‘flat’ (ie you could not see clearly through them and there was some distortion of what you could see) and I thought that the ‘brass’ surrounds were a bit on the skinny side. |
|
I turned up brass rings that are a push fit in the window apertures and cut glazing from microscope cover slides that will be retained with varnish in the deep recesses on the inside of the cab. I use a carbide-tipped scriber to cut the glass (0.15 to 0.25mm thick, typically) but I have only ever cut straight lines before; to cut the circular windows, I scribed circles using a draftsman’s template and made four windows straight off without any failures, which was very pleasing – and quite surprised me! As well as some of the modifications that I have already described, you may see the replacement steel handrails at the entrance to the cab and along the side of the tank. The moulded half-round handrails at the cab were neatly executed but I wanted polished steel finish so I turned up some little plastic ferules to glue to the edge of the floor (exposed as pink plastic) and carefully drilled 0.5mm holes in the projecting beading at the top. The handrails are made from 0.8mm diameter mild steel with the upper ends shouldered down to 0.5mm to fit in the holes in the beading. |
 |
|
|
Similarly, I replaced the moulded plastic handrails around the tank (assembly as removed from the loco shown in the photograph left) with the finer 0.8mm diameter steel and I turned up some replacement handrail knobs to suit but I did reuse the lamp iron on top of the smokebox. |
|
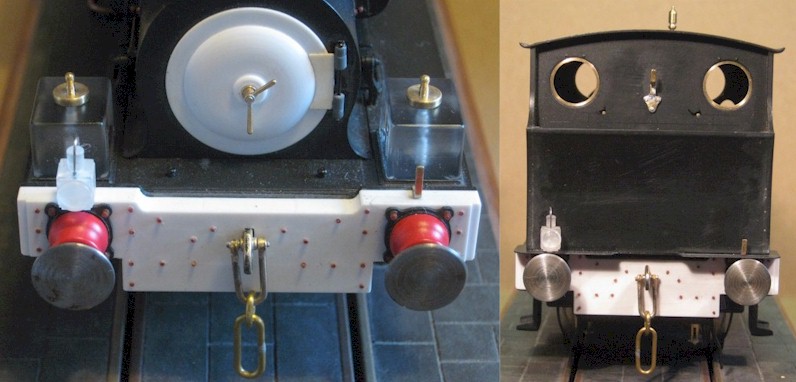
I made some lamps and lamp irons for the front and rear buffer planks and for the upper cab back sheet; the Ixion model had a good representation of the latter but I modelled the older, more ornate version with three fixing bolts. I milled the lamp bodies and turned the lenses in clear acrylic, they look rather ghostly in the photographs but they will be fine once they are painted. |
|
|
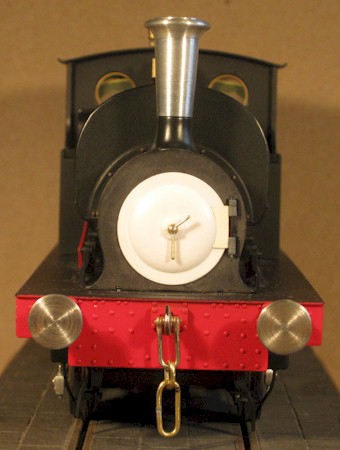
I deliberated with friends on the Gauge 0 Guild Forum for some time about the lining and finishing; the general opinion was that GCR 278 was black, bore only the vestiges of the contractor's livery but was generally filthy and unkempt. In the end, I enlisted a bit of modellers’ licence by adopting the GCR goods lining and the number of 278 but without the ‘Great Central’ branding. I also retained the name bestowed by the building contractor at Immingham Docks and I etched some ‘HUMBER’ nameplates in brass. |
| As you may see, the professional painters have no worry about competition from me but I do try my best at lining with a bow pen. There is nothing special to say about the painting and lining; I used Humbrol enamels with a Badger 150 airbrush and a Haff bow pen and compass with a final, overall coat of Floquil Flat Finish. |
|
|
Working all the parts into the cab was a bit of a ship-in-a-bottle sort of exercise but, with a pair of long, fine-nosed tweezers, all the painted parts went back in their places. This rather cruel close-up (left) looks in towards the rear and towards the front. |
|
… and another cruel close-up shows the modified injector and pipework on the RHS. |
|
|
The colours have not been reproduced terribly faithfully; the handrails and the reversing rod are polished steel, rather than painted grey, and the numbers are very cream, rather than the white that they appear here. |
|
. |
In any exercise such as this there is some ‘collateral damage’, that is there are original parts that are no longer needed on the model; here they are (left). |